We got the itch to build an earth oven here on the claim after finding the book "Build Your Own Earth Oven" by Kiko Denzer; THE source for DIY mud ovens. Great results and the final cost to build: absolute $0.00. We used only materials we had on hand and recycled from our salvage and then located clay, stone, grass, and sand sources here on the place while on our evening walks. It is built behind the house site and handy to the camp. We've used it several times for bread and pizzas and Jeree has nearly perfected fire building for a nicely browned crust. Here are progress photos and final pix of the project:
The base is built w/ 4 stacked earth-rammed tires ala' Mike Reynold's "Earthship" construction. It takes lots of dirt to ram one full but makes for a very dense and stable base. A single T-post driven in the center kept the tires straight while tamping them full and then was cut off flush.
 Next the tires were wrapped in several layers of old wire fencing for cob reinforcing. The fencing was cut off and secured to the tires w/ bent over nails driven into the rubber.
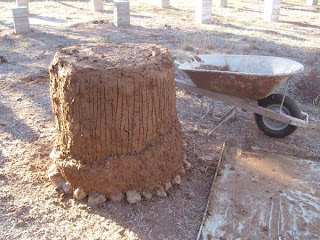
 The first layer of cob is built over a stone base to raise the adobe up off the ground. The cob is mostly clay topsoil mixed with sand and dry hay for reinforcing then forced into the wire layers tight to the tires.
Layers of cob were built up to about 6" thick all around. It is looking like the Devil's Tower from Close Encounters.
Wet sand is formed into a dome form for the oven itself. The bottom edge of the dome is near vertical for a few inches than compacted to a smooth dome whose height is half the diameter of the width - a little over 2' will be big enough for pizzas and a couple of bread loaves.
The next layer of mud over the sand dome is heavy with grass for insulation, the layer of newspaper keeps it from sticking to the sand. Another layer of cob brings the final dome thickness out to about 6" and flush with the base below.
From the front a door opening and lip is formed, The height of the door is 63% of the height of the interior of the oven. That proportion comes from the book and was supposedly derived after studying hundreds of successful burning ovens so we didn't stray from the instructions on that detail.

Next the sand dome is removed through the opening and the interior oven surface is left exposed. With a stiff cob mixture it is self supporting now. Joey, our Basenji, has to get in on the project.
We used a broken tile mosaic over the dome to help shed water and add some color. The tile was dug up while doing house demolition and was just stuck into the top layer of mud while it was still wet. A final coat of plaster over the whole thing will finish the oven and "grout" the tile into place.
 Done. Cleaned up and burning a small fire to help dry it out from the inside. After a few more fires and a couple of days drying time we cooked for the first time. The oven burns a beautiful slow fire with long licking flames and very little smoke. An hour of mesquite branches will heat it up to about a 450 degree oven temp. We've found that a few coals left around the edges while cooking browns things really nice. A door was made out of heavy wood about 5" thick and shaped to fit the opening, soaking the door in water makes steam inside and keeps the door from scorching.


hi, we are in the middle of construction on a similar project and the land owners started to worry. Have you had any problems of safety? Have the tires wanted to vent off any vapors?
ReplyDelete