8/28/2011

a summer to remember


Day 77 of triple digit heat beating an 89 year old record with the forecast showing 100+ possible for the next several weeks. We had 2/10" of rain last week, the only measurable rainfall for months. Stage 2 water rationing in Austin. And then came this weekend, 108 yesterday and today 110 or better. The thermometer on the front of the storage shed in full sun facing west stands TOPPED OUT. Redlined. Have never in my life seen a thermometer topped out at over 120. Have installed the rainwater tank on the back of the house in this cursed weather, will someday hold 1000 gallons +/-. It was here on the place already and repurposed here atop a 4' high sturdy stand made of 4x4s and 6x6s elevated for a little bit of gravity pressure enough to run soaker hoses for irrigation. It is lined with a new heavy vinyl liner made from a large above ground swimming pool bought for a song on Craigslist compared to a new commercial liner. I calculated it should be full after only an 1" of rain, the shower last week filled it a foot already. Have yet to build a floating ball first flush device or overflow for it; will do those chores once it has a little water in it to flatten out the liner near the top of the tank. The finishing touch is the official claim logo - a flying tricycle in homage to Miss Birdie; the original owner of the place.

The heat and drought has really affected the local wildlife. We have had a resident roadrunner the last few days in search of a dependable water source. He managed to get himself stuck in the open chicken coop today allowing me a closer look and photo-op. 


7/21/2011

Stop ****ing In Our Drinking Water

Bill Gates just announced a major initiative to reinvent the toilet. BRAVO BILL! It takes balls the size of Micorsoft's yearly profits to go public and say that there must be a better way. To be certain; he is addressing the bigger picture of the world-wide problem of improper sanitation and lack of access to a clean place to take a simple dump. I'm talking only about the ubiquitous, and silly, average american toilet.

It is impossible for our culture to not snicker at anyone who tries to reinvent the humble throne. The fastest way to get shot down by the judges on the reality show "American Inventor" was to walk in with anything connected to a toilet. The background music might as well have been the pitiful "wah wah wah..." loser sound bite. Thankfully, some people have started questioning the sanity of flushing a toilet with drinking water. The "Water Legacy" is a filtration system for the home that recycles and routes grey water into the toilet. Good grief! What took so long for this to be be considered? Modern plumbing codes don't allow grey water systems in most places - cross contamination may have been a real problem in the past and separate utility systems would have to be addressed on a massive scale to handle greywater separately but we can't simply continue spending billions of dollars to sanitize all wastewater into drinking water, piping it to our homes straight into a toilet for a few minutes before someone in our family comes and contaminates it and sends it down the pipe back to the sewage treatment plant again. Absolute insanity when you even consider it for a second. Just consider this factor alone: How much drinking water is wasted every day flushing our toilets? (in very round numbers)

The approximate US population -  312,000,000. This includes about 7% of the population under the age of 5. Being very generous here to say that kids under five are not potty trained yet (they probably mostly are or dern well better be - but they didn't give a percentage for under 2 years old.)  We subtract out their population to derive at 290.2 million toilet users. 

Calculating  how many toilets there are  (somewhere between 225 to 350 million), how big the average home is or how many bathrooms there are (2700 square feet and 2.5 bathrooms - 3 toilets in other words)  is more or less irrelative because all you have to do is consider that a toilet user is going to find a toilet to use whether it is at home, school, work, etc. 

How many times a day do we flush our toilets? Plenty of polls are asking for your vote but no serious consensus can be found.  I read the nice even number of 5 times/day plenty of times. 

How much water does a toilet use? Old toilets flushed with 3.4 gallons. HET - high efficiency toilets - use 1.3 gallons. Ultra HETs use as little as .8 gallons. There were plenty of cursed low flush toilets sold that used 1.6 gallons that pretty much demanded you flush them twice to get it all down the pipes. Dual flush toilets and conversions are available that use even less water to flush pee by itself. Calculations get complicated real quick in guessing how many of each type of toilet is used, how many times a dual flush toilet is used per day just to flush pee, blah, blah, blah. It may be impossible to ever know because it is not accurately tracked by anyone apparently. A neilson type home survey of 1000 american's toilet habits over a six month time period would be most fascinating. Only for arguments sake and being conservative can I throw out the average water consumption as 2 gallons per flush.

290,200,000 flushers x 5 times/day x 2 gallons/flush. There it is: 2.9 billion gallons of fresh, highly processed drinking water wasted per day to usher **** down the pipe. Amazing. 

I don't even want to consider how many Olympic size swimming pools that is. It's 440. 

Our toilet, as mentioned before, is a SunMar composting unit with a ceramic ultra low flush toilet. Probably less than 3 cups to flush. And our three member family flushes it about 5 times a day total. A gallon a day to flush our toilet. It's not using grey water - yet. But we do have grey water for the rest of our plumbing system. Rainwater for irrigation. And me and the boy pee outside. A lot. OK, most folks don't have 12 secluded acres of living space to have that most basic luxury of life in the country. Sigh. It all seems sensible, economical, and normal to us and not the least bit uncivilized or inconvenient. 


6/20/2011

screened porch

1st day of summer and here in central Texas we have already had two weeks worth of triple digit heat.

We have always wanted an old-school screened in porch for lounging, listening to night sounds, a tall cool one, napping, etc. etc. Nearly there. The house was designed with a screen porch from day one to add living space but it also evolved to include a laundry area (Hand washing in a double galvanized tub. You read that right. Still looking for a good modern wringer to go with it.) and a water heater / electrical / A/C closet. We spent a great deal of time out there already as a temporary shop area while we finished the interior of the house, it stayed buried under a folding table for my chop and table saw and piles of wall boards until just a few weeks ago. It is on the back - east - side so it is shady all day after 10am and has an elevated view of the largest prickly pear on the entire place. After the front deck was wrapped up the final big ticket item on the preliminary punch list for the house was the screen walls themselves. Still doing some decorating and fine tuning to do but happy to report we have spent many hours already in our fully semi-transparent, cinemascope view of the back woods, breeze blowing, mood lit sanctuary. Now if it would just rain and cool the hell down for us to really get the full effect.

The walls were framed with 2x material ripped to 1-1/4" x 3" verticals. All the perimeter frame was dadoed to receive 1x1 screen stop. Charcoal color aluminum screen was stretched and stapled over the frames and then all the staples covered with the square wood stops for easy repairs down the road. All the wood was stained with a semi transparent Behr stain like the rest of the framing on the deck. The back wall of the house inside the porch was sided vertically with hardiboard spaced about 3/4" apart then stripped with vintage molded battens off of the old Hills Prairie post office damaged beyond repair in a small tornado. Still have a few plugs to fill for complete bug security. I rigged small christmas lamps into two old hanging kerosenes lanterns for mood lighting, the shadows of the rafters and ceiling fan blades are a bonus. We built in a doggie door next to a fully restored screen door salvaged from Birdie's house and saved it back just for this porch. A collection of vintage chairs; a repaired antique wicker beauty found beside a dumpster, a very heavy 50's Rayette hair dryer (St. Paul Minn. The inventors of Aqua Net hairspray. Finest potato gun propellant know to mankind) that we bought years ago at a Salvation Army store and a pair of early Herman Miller fiberglass side chairs all surround a galvanized topped coffee table with cedar branch legs on a cool new outdoor sisal area rug.


It is a crying shame that screened porches went out of vogue; they are a great retreat from the bugs and heat, low cost additional living area, a great gathering place and nostalgic to the max. We feel like we are on vacation in a remote vintage camp soaking up the evening breeze, listening to the bugs and night birds singing in quadraphonic all around us. 

5/25/2011

textures

a new flight deck for Joey

Added a front deck recently so getting close to finishing up the front elevation. Recent projects include finishing up the hardi board siding painted a bright spring time mesquite leaf green, some new palms and repaired Adirondack chairs I built about 10 years ago. Cantilevered it about 30" to match the house. We will eventually landscape under the front edge to conceal supports and to aid the floating look. The framing is all of salvaged 2x8 treated lumber bought for a song off of craigslist. It was formerly a short lived arbor, hence the sawn ends and matching sawn 2x12 underneath. Decked it with treated 2x4's screwed off completely with 3 1/2" composite deck screws and then sanded it to remove all the markings and screw head burrs. It takes extra time for screws over nails but with freshly treated material you have to get it fastened down hard and tight to maintain straight lines. We're on a budget here so Ipe or other exotics, KD treated, composites etc. were not really considered this time. I've tried all the alternative decking materials, 5/4 deck boards, stains and sealers, concealed fasteners, and have decided that no matter what you do or how much you spend any wooden deck will still require maintenance, repairs, and eventual re-decking so it makes some sense to keep it simple, economical and easy to replace someday since it is inevitable. 
The end result is barefoot smooth, drains well, is flat and straight and zen minimalist simple. The dog loves the elevated vantage point and she hangs out along the edges so she can launch off of it like a aircraft carrier flight deck whenever an out of line chicken, unannounced visitor or low flying buzzard is in need of a spontaneous sorte. Some open riser stairs to match the deck replacing the temporary construction steps are being mulled over featuring a welded steel handrail made of some antique twisted rebar salvaged from another project. 

2/22/2011

doors, bathroom & a bedroom.....


One of the original two-toned doors salvaged 
from Birdie's house.
The 1910 doors are only 1" thick.
Wire hooks came from a 1910 courthouse,
  the bottles were scattered all over the claim.
A hundred year old 1910 era rimset with salvaged 
crystal knobs, even the privacy latch still works.
A grandmother's quilt, 1890's pressed tin shingles found on the claim with a cornice 
from the original JC Penney's store in Amarillo, TX. The shelf is waiting on a 
collection of 1960's lady head vases.The drawing is of my grandfather's western 
swing band in the 30's, the piece over the mission rocker was inspired by a 
voodoo shrine in New Orleans devoted to swamp witch Marie Laveau.


1/31/2011

door hardware

Even 120 year old rimsets, knobs and hinges still have a lot of life in them. The set above has a broken throw-bolt but the springs, latch and privacy lock work just fine after a good cleaning with Navel Jelly, WD 40 and a wire brush. That is some serious Wabi Sabi. How many thousands of hands have held these knobs? The crystal knobset came from a house remodel in Amarillo, the porcelain and steel sets are originals from Birdie's house and the bakelite lever was a donation from cousin Terry. All will have a new life here in the house. Several years worth of collecting have yielded enough antique hardware for all the interior doors. Rosettes, keyhole covers, rimsets, knobs and matching butt hinges. The panel doors from Birdie's house are only 1-1/8" thick but are all flat and straight. Some have to be completely knocked apart to reinforce joints and add dutchman repairs from old hardware scars. All will simply be sanded smooth and waxed to finish. The original paint will be retained and the years of worn rounded edges are kept and treasured like a pair of comfortably worn jeans. 


1/13/2011

old skool analog wall clock

I stopped wearing a watch years ago since you can't seem to escape a digital clock somewhere nearby either on the dashboard, computer screen, cellphone, vcr, microwave, or passing bank sign. I also found that without the clock crutch on your wrist your internal body clock will fine tune itself. I can usually guesstimate within 30 minutes what time it is by instinct (until daylight savings time throws me off for a few weeks). But with the new TV without a clock and deletion of the ubiquitous VCR we suddenly found ourselves often wondering what time it was a little more accurately for homeschooling. I've always been a fan of George Nelson atomic clocks, especially the skeletal but mostly commercial built-in types with the floating hour markers mounted directly to the wall. Obviously; those require preplanning in a "normal" house to have access to the clockworks inside the wall. Solid salvaged board walls in the new house afforded access to both sides of the living room wall for an internal movement. All that was required is a small flush mounted access door held by a single screw on the bedroom side to get to the batteries. Hobby Lobby provided an inexpensive movement with tacky traditional hands but voila'; they also had longer straight hands in brass that only required a quick coat of white spray paint. They contrast cleanly with the weathered wood background, carefully preserved graffiti and all. Small wooden hobby spheres and larger split spheres work great as hour and 5 minute markers ala' the radiant spheres of Nelson's original. I laid out a template on the iMac for accurate placement of the hour markers about 14" across. I then taped it to the wall in a visible spot from all over the living room and kitchen, tapped the locations with a nail set and drilled a small pilot hole "dent" to glue the beads into place. We have mid century modern accents throughout our collection of stuff so the new clock seems right at home, even rusticated as it is, with the large 60's light globe pendants salvaged from an old church remodel and a pair of danish bent plywood backed side chairs from the 50's bought at auction. 

12/14/2010

home sweet home


We've been enjoying the new digs since Thanksgiving; got the Kitchen, living, bath and one bedroom 90% done or more. Went ahead and moved in while we are working on the last bedroom. Still lots to do outside too but the light at the end of the tunnel isn't just a glimmer anymore but is a pretty darn bright searchlight. Two hard weeks could finish it but finding two weeks in a row to take time off is a real challenge right now. Guess we'll have to stay satisfied with weekend progress unit it is finished. The tin shingles behind the TV were found piled under a tree on the place, lots of cleaning and straightening allowed the 1890's roofing to coax itself back into the original slots and they aligned beautifully again once more after all these years of neglect. The ceilings came off of an add on craigslist. The early 60's globe lights came out of the First Baptist Church in Wellington, Texas - we've been carrying them around for years looking for a suitable home.  More soon.

10/22/2010

300 lb.s worth of concrete sink

 The kitchen area is coming along nicely with the whole thing planned around a cast 'crete sink. Appliances were bought first to be sure of final dimensions and a late decision to use a porcelain top off of an old Hoosier style cupboard shortened the length of top to build by about four feet. The narrow 20" wide stove (that the punk kid at Home Depot insisted didn't even exist) placement gave me the dimension for a short butcher block top over to the wall and the window placement informed me of what was left of the wall. The resulting wall yielded close to 60" of counter space to fill with the concrete top giving us a single bowl sink centered beneath the window and a integral drainboard to the left. The grey water lines preclude using a disposal - have never been a big fan of flushing good compost material down the sink anyways. We first built the legs to support it out of galvanized 1" pipe using wall and floor flanges, the same pipe was used as a base under the porcelain top. Formwork for the concrete was built across the living room up on legs so that when we flipped over the final form it would be as the same level as the top and we wouldn't have to do any lifting.  Smooth MDF board was used as formwork and then we caulked all the corners for a nice eased edge and heavily varnished it all to seal it from the wet concrete. The trickiest part of the whole affair was wrapping my brain around and then building an upside down drainboard and sink form with leave-outs for all the drain basket parts. This is hardly new technology; other people are masters at this but this was only our second foray into the alternative universe of the concrete countertop. A good article from Fine Homebuilding gave some direction as to methods and tips but as usual winging it is in my DNA. I used an acrylic plasticizer and dark charcoal colorant mixed with three and a half 80 lb. sacks of ready mix. The concrete was reinforced with a birdcage made of wired 4x4 hardware cloth. The local mix of sacrete is aggregated (is that a word?) with limestone chips so it made for a nice contrast with the darker matrix; a nice grog to background ratio.


According to experience a drier mix yields the strongest product, but against my better judgement for flow-ability, we went with a dry enough slump to make firm softball shaped lumps straight out of the wheelbarrow. Lots of tamping, screeding with a 1x2, form tapping with our trusty lead shot mallet and vibrating with an orbital sander (w/ no sandpaper) against the sides brought the concrete to level and all the water migrating to the top suggested a nice settlement of the mud into the form's nooks and crannies. It set for an entire week curing while I worked on other projects. Alas. The much anticipated form stripping unveiled a ton of dry spots, pits, and minor honeycombs. So much for that dry of a mix. Should have used a little more water to get it to flow but the darn thing literally rings it is so stout. We procrastinated worrying over the final finish until it was installed. I added ski rails to the form table and then used PVC pipe rollers to move it egyptian style across the room. 2x4 levers, stacks of gradually removed blocking and a floor jack eased it over and down where it belonged, with nary a busted toe or broken corner. The sink was rubbed and plastered with a thin slurry of more concrete sifted to remove any aggregate and colored extra dark hoping that the filled spots would add more visual contrast. It worked effectively but we wish it had been a smoother finish straight out of the form. After letting it dry overnight the entire sink was sanded with sanding blocks and 80 grit followed by 150, 220 on the orbital sander and a hand polishing with wet/dry 800 emory cloth. It has been sealed three or four times and then waxed by hand. The water bounces off of it and the surface looks like honed lava rock. A helluva lot of work make no mistake, but with the copper spout, and antique brick window sill for fresh herb growing it is the center of attention in the whole room.

8/13/2010

Holy Mesquite Batman!


The bathroom floor experiment continues. The log end tile is grouted but due to a slipping thickness jig had to do a lot more in-place sanding than anticipated to even up the floor. Had plotted to use mostly mesquite harvested from the claim but have found that most of what we had cut and stacked was beetle infested on the outer edges leaving me with an unacceptably holy (hole-y) cross section. Fine for fire wood, not so fine for floor tile. A mix of species filled in the gaps and slicing up old cedar and possibly bois d'arc fence posts yielded the prettiest cross section of them all. Scrub oak branches with thin bark look almost like hard boiled eggs and some cedar pieces are wildly shaped. They have grouted very well with little or no shrinkage in the joints. A dark brown grout color was chosen to be complimentary to the darkest pieces of mesquite. We pre-sanded the 1 3/4" thick pieces, glued them down with the strongest vinyl based tile mastic we could find followed by a sealing coat of varnish before grouting. We were afraid the grout would soak into the absorbent wood obscuring the wood color and grain. The grout will be sealed but not before we sand the wood again with 220 grit on an orbital palm sander to polish the wood up before waxing them individually. Jeree made  a small test sample to check for wood color and grout shrinkage and what would happen when we varnished both together. Simply varnishing the whole thing pulled some kind of mineral out of the grout and left white crystallized spots. Some as yet undiscovered grout sealer designed for absorbent stone may do the trick but we don't want it too shiny. A waxed and smoothly worn appearance is more like it. Obviously a lot more work than ceramic or vinyl would have been but certainly not the unique floor we were looking for. Can attest to the toughness of the floor already as I have test dropped lumber and tools on it several times with no dents or chips. :)  

7/09/2010

a hot humid summer


July is getting away from us already and its been a hot and humid one. Been working nearly full time on a big restoration project in downtown Houston; a 60 mill plus rebirth of the Harris County Courthouse. Houston in the summer is the kind of place that simply wouldn't exist if it weren't for air-conditioning. It has meant less time at the claim than hoped for this year but in this economy lots of work - no matter the downside - is a blessing. We have been camping out during the week in a ridiculously large rent house in North Houston with several other coworkers that is economical for the company but makes us want to flee for the peace and quiet of the country every weekend only three hours away. After yet more urban living it is a solid reaffirmation of what we are doing here with our humble home project too.
Even with sporadic progress the house is completely wired - plug ins everywhere! What a luxury! - all the plumbing is roughed in, there is a functional toilet, all the insulation is complete, and the all important air conditioning. We have started installing exterior siding, the bathroom mesquite floor, and will start on interior walls soon.
The electrical consists of underground service to 160 amps worth of service, more than adequate for less than a thousand square feet. There is lots of daylight so what little lighting there is will consist of CFL lamps and a few task lights at countertops and sitting areas. I have a weakness for funky lamps, we have gathered vintage fixtures for years that are in storage waiting for use. Dedicated, switched, and GFI outlets are spaced to code. After much deliberation on the AC needs we went with the simplest solution: three through-wall units. They are energy efficient, easily sized appropriate to the space, have no condenser on the ground, no ductwork, quiet, economical to operate, and easy to replace.
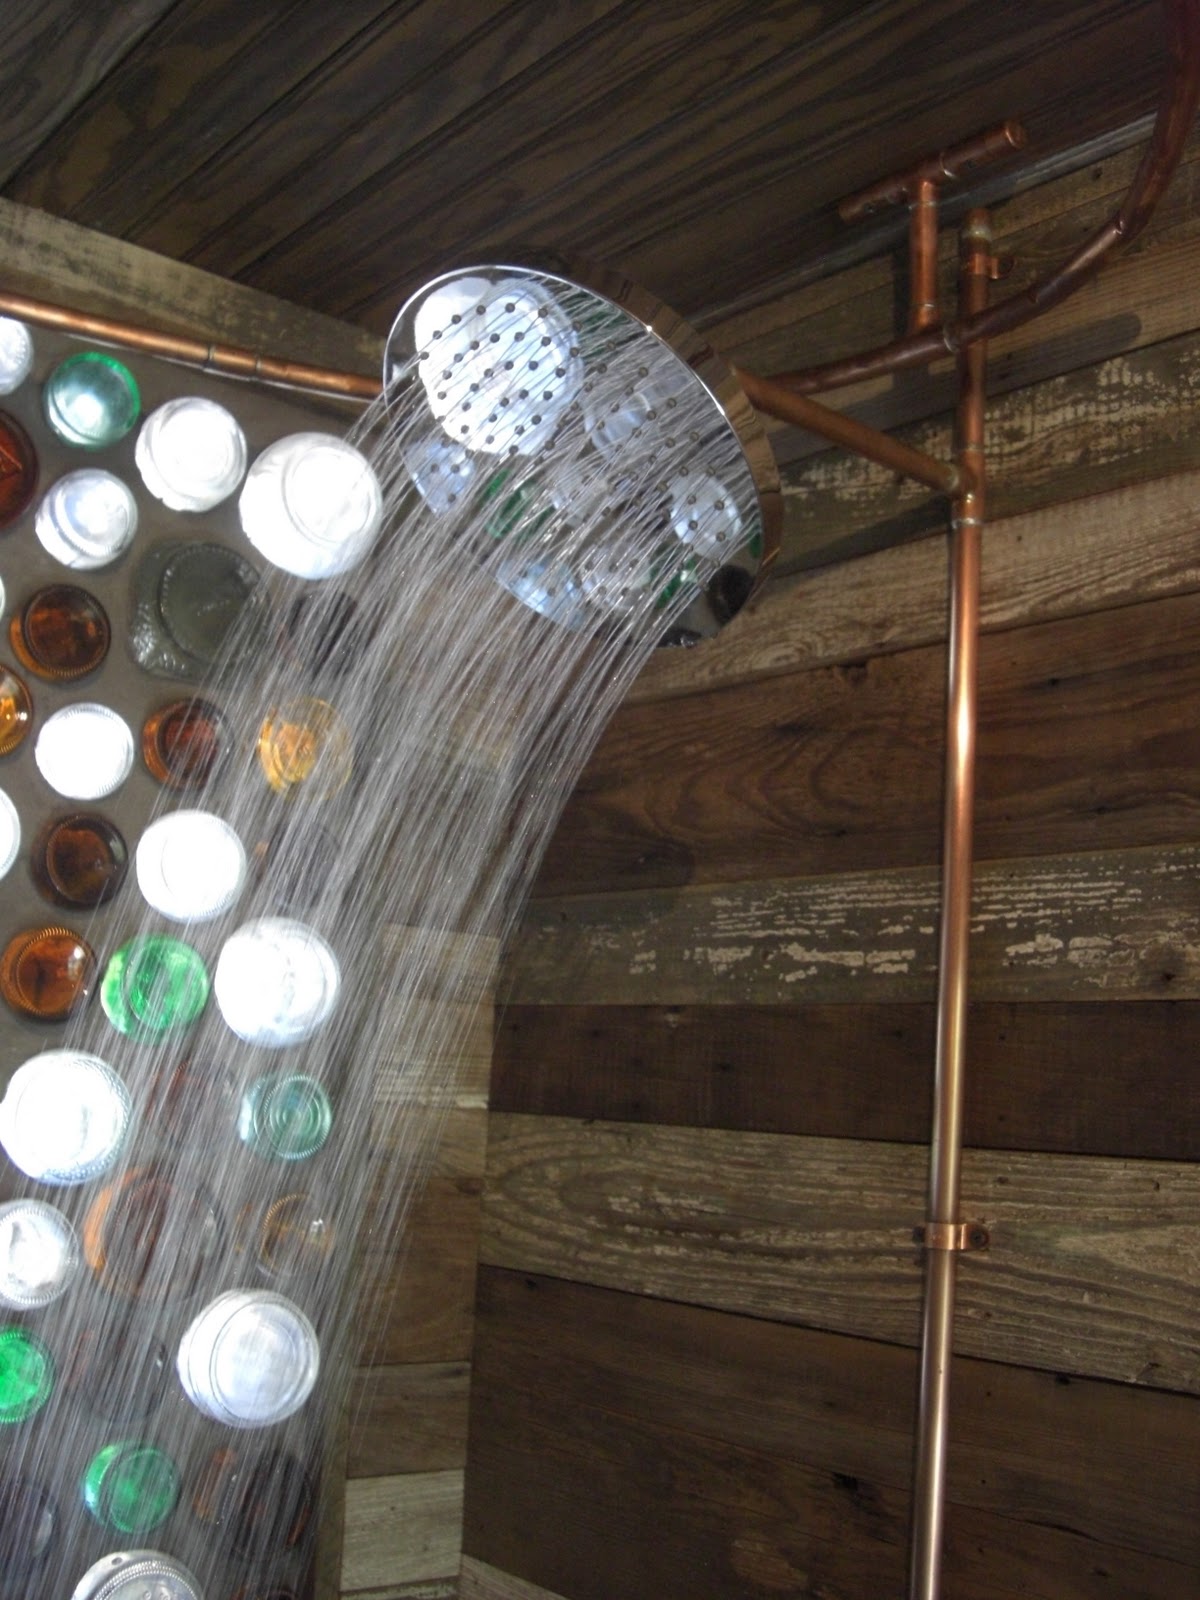
Plumbing is going to be exposed copper piping, neatly arranged and sweated connections and simple brass valves at the sinks and shower give the desired industrial hi/low tech look but also keep pipes out of exterior walls to not interfere with insulation. We are using a Sun-mar composting unit with a Dometic SeaLand low profile toilet. I did lots of reading before choosing the system and we are still fiddling with it to get the maintenance down so cannot gloat about the choices so far. There is not room under the floor for a totally direct dump dry composting unit and have never liked the look of an all in one self contained composting toilet. ( They look like you are perched atop a portable sauna.) The Sealand toilet is porcelain and looks conventional except for a foot pedal and no tank. Have had a little trouble with the water seals on the toilet but it is a huge step up from an outhouse. The toilet uses less than two cups of water to flush, a must to keep the compost from being saturated. The Sun-mar has not produced any finished compost yet but appears to be working fine. More experiences to come on that.

4/23/2010

a little progress....


3/19/2010

Nasher Sculpture Garden


Been wanting to visit the Nasher since it opened in Dallas next door to the DMOA but have not had an opportunity to catch it open - until yesterday. A beautiful spring day, not too many people, and it did not disappoint. The building by Renzo Piano is terrific enough, with all the subtle classical / contemporary beauty and subdued natural lighting of Kahn's Kimball in Ft.Worth. Not as astounding to me personally as Ando's Ft. Worth Modern but still I really appreciated the restraint and deference of the building to the collection. The grounds are pristine; some of the varieties of trees are sculpture in themselves. A boardwalk under a huge weeping willow is its own environment. I'm partial to bamboo anyway and long screens of manicured bamboo in gray river rock beds are to drool over.
I especially wanted to see Turrel's commissioned skyspace. Basically just a small room with a hole in the roof. But what a hole. He's done quite a few of these now and the premise is that a paper thinned edge reveals a patch of sky from below as a plane on the ceiling. Unless there are some reference points like clouds, a plane passing by, etc. it is impossible to tie down exactly what it is you are seeing. It doesn't look like blue sky but some strange new velvety material you've never seen. The execution is almost - but not quite - perfect. Unfortunately, conceptual things like this need to be perfect to even have a reason to exist. The sky yesterday was an average bright, light blue. The edges of the hole are thin but still visible, open joints in the interior of the minimalist room necessary for rainwater drainage and subtle holes for security cameras are small but still are distracting in Hi-rez real life reality. Later in the day as the sky color deepens and in "golden minutes of opportunity" it must be really memorable. In actuality it photographs beautifully even by hacks like me with a point and shoot camera. Maybe losing the 3rd dimension heightens the way that a simple hole in the roof reads as a whole 'nother entity. It requires a shift of perception to appreciate. Genius or stupidity depending on your point of view. Worth another visit to see in different conditions.

The thing that impressed me the most about the visit was that it is obvious that millions were spent on the site, the building, and the collection yet the art is extremely accessible. No rope barriers surround the pieces. Guards were posted all over but were friendly. Walking on the grass and through the negative spaces of several of the larger sculptures is actually encouraged. Signs said no food and drink or flash photography but still photos and sketching of the pieces by students are welcome. Families with small kids were all over and as I left a large group of small kids showed up and were met with smiles by the staff instead of expressions of terror. A temporary piece is of a virtual solid curtain of floating stainless steel text hanging by thin lines that completely cut the building down the middle; there was no way to get to the other side without pushing your way through the piece like a walk through wind chime. To me, the concept of the piece by a south american artist was highbrow and irrelevant. The fact that visitors and children could actually touch it, make it tinkle and were basically forced to interact with it was really refreshing. Small signs discouraged touching of the bronzes for obvious tarnishing reasons and I'm sure climbing on anything by little heathens would be quickly dealt with too but all in all the center has a nicely laid back presentation.
Out in the garden I was appreciating an up-close look at a Richard Serra pair of arcing steel slabs, wondering how in the hell slabs of steel so massive can be formed, handled, shipped cross-country and then placed so delicately in balance with each other. I especially liked the fact that tong marks along the top edge of the bent plates are evidence of it's foundry birth and were left in place. The logistics of things like that will totally escape 95% of people. I was starting to walk through the narrow space between the steel walls when two little girls ran up wide-eyed and asked "Can we go in there?!" I said, "Oh yea, your supposed to!" pointing out the gravel walkway between. Being familiar with the acoustics inherent in his sculptures (the piece in Ft. Worth has amazing reverberant echos) I added "When you get to the middle you have to yell real loud." They gave me a leery eye but ran full throttle through the void squealing. Their parents met them at the other end with their mouths hanging open. The two little rats pointed me out; "You have to be real loud, HE said your sposed to!" Ahh... yes. I just shrugged my shoulders and laughed.
Note to artists: Please cut through all the crap, no art should take itself too serious if it is ever going to be really appreciated with joy. Check it out.

progress


3/13/2010

Framed up the mantle (already collecting junk) & hearth for a woodstove using antique brick from the Hubbard / Hill Cemetery at Hills Prairie on the floor. Quartz rocks and petrified wood from the claim will be the backdrop.

The screened porch with electrical and water heater closet is taking shape, destined to be our favorite room in the house.


3/11/2010

building a better bottle wall


Have always admired bottle built walls and windows, a time honored folk art way of laying bottles up as masonry with grout. Poor man's stained glass. The bottle village in California is even on the national register of historic places. I've seen whiskey bottles used, beer bottles, coke bottles, wine bottles, even embalming fluid bottles in an old ghost town in Arizona. A bottle house in nearby Wimberley built entirely of coke bottles laid in patterns is a beautiful example. I had the idea to build a large window into the bathroom out of bottles and jars over the tub; it would form one long side of the shower and can shed water as well as glass block. The tub may actually end up perpendicular to it now because of a plumbing situation with the composting toilet we've selected but it will still serve the same purpose. Started with a healthy frame of full 2x material for weight and adequate depth well anchored to the 2x6 stud exterior wall. The bottles are laid up with a bed of mortar leaving exposed ends inside and out that will then be grouted with tile grout after we get all the bottles in. The inherent problem with bottle wall construction is if a full bottle is used then one side or the other is going to have an open neck. I've seen them alternated, with the necks pointing in, or the necks pointing out which makes for the prettiest exposure through the butts from the inside but makes for a great place for bugs, dirt, and moisture to accumulate. If one were able to cut them in half, turn two ends together so that there is a butt inside and out it will solve the open end problem and admit the maximum amount of light in the process but it means using twice as many bottles and lots of cutting. The benefits are worth the trouble though, the resulting "brick" is not argon filled low-e by any means but a 7-1/2" deep dead air space is pretty damn good insulation. Trial and error (and error) gave us an efficient process for making consistent clean cuts. Ronco sold a miracle bottle cutter over the TV when I was a kid, it was a piece of junk and didn't yield us a cabinet full of free drinking glasses, windchimes on the porch or flower vases for Mom but I seem to remember I had fun with it for a day or two. It was basically a jig to hold a glass cutter head a certain distance up from the base of the bottle, spinning the bottle with practice makes a nice even score around the bottle , a bent wire tapper inserted down the neck will finish the break. Sandpaper the sharp edges and Voila! - you just made an ugly drinking glass. I made a plywood jig half the height of the depth of the wall, attached a new glass cutter with screws and with practice it yields a very straight cut. Forget the tapping; the ringing of a bottle is of a deafening frequency and the break lines tended to wander. I have cut bottles before with an alcohol soaked string tied around the jar: light it and let it burn out to heat the glass at a precise line followed by a quick dunk in cold water. The temperature shock shatters the glass in a surprisingly clean line. Neat trick but no good for mass production. We tried holding the score over a candle and dunking in water; meh. Mixed results. More heat! More cold! Yin and yang, fire and ice. Spinning the score line over the low flame of a propane torch followed by a spin on an ice cube snaps that sucker right off. Any broken edges can be cleaned up with nippers. The halves are matched up for size, cleaned, left to dry and then taped together using adhesive stainless steel tape used for duct sealing, one of my new favorite essential materials after duct tape, baling wire and queso. The subsequent sealed joint is buried within the depth of the mortar bed. Mixing colors from end to end - half brown, half clear - gives us more of a color range to work with. Old Evian bottles from our stock at the gazebo are a great turquoise blue, the cobalt blue milk of magnesia, square ice blue gin bottles, lime green rolling rock and olive green wine bottles, and oversized brown Clorox bottles mix nicely. The light transmission is better than hoped for. We have no shortage of jars and bottles yet plus my beer selection of late has leaned towards the bottle color over brand in anticipation of this project. The son-in-laws have filled in the gaps with lots of green, clear and brown beer bottles. Road kill provided us with a large wine bottle and a stop at a BBQ joint turned up gallon jalapeno pepper jars that will let in a lot of light. Random sized round bottle ends form an intended visual connection with the mesquite log ends we will be laying the bathroom floor with. Now we have the family gathering bottle caps to grout down as a tiled vanity top for a similar theme at a smaller scale.